Hello World Batch Job from Scratch
This tutorial will walk you through scheduling your first Batch Job, and introduce useful features to help you efficiently work with Batches.
Simplest batch job
File structure
Let's start by setting up the necessary file structure. Any code executed in Datatailr must be located in a folder within a Git repository. You can use the Explorer tab in the IDE app to interact with the file system.
Create the following structure:
datatailr-tutorial/
    hello_world_batch/
        entrypoints.py
Here datatailr-tutorial would be the repository folder, and hello_world_batch is the folder to store our code.
Code
Paste the following code into the entrypoints.py file.
import dt.scheduler

@dt.scheduler.batch()
def job_entrypoint():
    print("Hello, world!")
The @dt.scheduler.batch() decorator makes a function available as an entry point for tasks(jobs) within the batch job.
Note Throughout this tutorial words "job" and "task" will be used interchangeably. They both refer to an individual job, executed within a Batch Job.
Building
The process of building the package and the image containing a batch job is similar to any other Datatailr runnable. If you are not familiar with it, please refer to the Hello World App tutotial. You will need to push your changes to a remote repository, for example GitHub.
Throughout the following scripts, the image name is Hello Batch and the package name is hello-world-batch. If you used different names while building, use them instead when you copy the code.
Scheduling the batch
The image with a batch job only includes the entrypoints, and it does not have any idea of how and in what order to run them. This is defined by scheduling.
The easiest way to schedule a batch is to run a Python script in the IDE. Create schedule_hello_world.py file in the repository folder:
datatailr-tutorial/
    schedule_hello_world.py  <--  here
    hello_world_batch/
        entrypoints.py
Paste the following code:
from hello_world_batch.entrypoints import *
from dt.scheduler.api import DAG

with DAG(Name="Hello, Batch!", Image="Hello Batch"):
    job_entrypoint()
Everything a scheduled batch job needs is defined via a DAG (Directional Acyclic Graph) object. General parameters like the batch name: Name="Hello, Batch!" and the image to use: Image="Hello Batch" are passed to the constructor. Tasks are added to the graph inside the with block. You can import all functions from your Python module: from hello_world_batch.entrypoints import * and simply "call" them, though they won't run just yet.
"Calling" an entrypoint function inside with DAG block adds a task with this entrypoint to the graph. This syntax only tells DAG which entrypoints from the image to run and what values to pass as arguments.
Note: Since DAG only uses function names and parameter values from the scheduling script, your changes to the entrypoint code in IDE won't be visible unless you rebuild both the package and the image.
Run the script. Either from VS Code terminal: python schedule_hello_world.py, or using the VS Code UI:

Left: using the Run menu. Right: using the Run button on the top right panel.
Running the batch
Executing the script will schedule and trigger the batch job to run immediately. To see the results, open the Job Scheduler app. The list of executed batch jobs, Batch Runs, will be open by default. Your run result will be on the top:
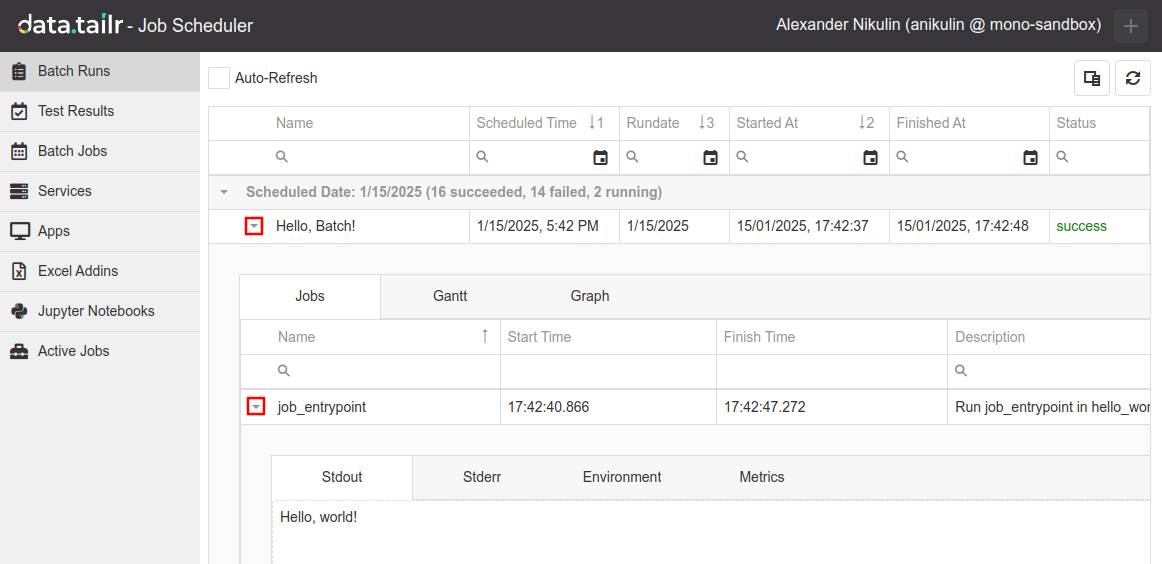
Expand the row with your batch. In the dropdown, you can find individual jobs from that run, with each job appearing as soon as it starts running. You can expand every job in a batch to examine their Stdout, Stderr. In your case, there should be only one entry named "job_entrypoint". Expand it, and you should see its Stdout with "Hello, world!".
If you don't see it, click Refresh in the UI:

After you schedule a batch, you can also see it on the Batch Jobs tab. From there, you can edit and examine how it was scheduled. We'll go over the UI later.
Creating batch with multiple jobs
This part of the tutorial expands on the basic example and showcases the features you'll see a lot during your work with batches.
Adding more entrypoints
Your batches will hardly ever consist of one job, so let's add more entrypoints to work with. Update contents of the entrypoints.py:
import dt.scheduler

@dt.scheduler.batch()
def create_message(rundate, job_config):
    greeting = job_config.get("greeting", "Hello, world")
    return f"{greeting} at {rundate}"

@dt.scheduler.batch()
def output_message(message):
    print(message)
As you can see, entrypoints can take arguments. The create_message function accepts rundate and job_config. These names are reserved by Datatailr and are automatically provided with inputs when the job is executed. rundate is the current date, and job_config can be used to pass values during scheduling. Any other non-reserved argument names, like message in the output_message function can only be used to pass other job outputs (e.g. output of create_message).
Other reserved entrypoint argument names are listed in the dt.scheduler.batch API reference
Scheduling batch with two jobs
Using these two entrypoints, we'll create a batch with two jobs. The first one will return a string, and the second will use this string to print the message.
Paste this script into theschedule_hello_world.py.
from hello_world_batch.entrypoints import *
from dt.scheduler.api import DAG

with DAG(Name="Hello, Batch!", Image="Hello Batch"):
    new_message = create_message(job_config={"greeting": "Hello, batch"})
    output_message(message=new_message)
Here output_message job depends on the result of create_message. This syntax: message=new_message maps the output of create_message task to the message argument and registers the dependency. Datatailr batch framework will execute jobs according to their dependencies in DAG. In the script above, output_message will run after create_message, whereas below both create_message functions will run concurrently:
from hello_world_batch.entrypoints import *
from dt.scheduler.api import DAG

with DAG(Name="Hello, Batch!", Image="Hello Batch"):
    create_message(job_config={"greeting": "Hello, first batch"})
    create_message(job_config={"greeting": "Hello, second batch"})
Notice how we don't pass rundate argument to the create_message function. Since this name is reserved, Datatailr will provide this value when the batch runs.
Dev Run
Usually, you must rebuild packages and images whenever you want to run your batch on the server. Sometimes, building an image can take a lot of time. A dev run allows you to run the code without rebuilding anything. Add these arguments to the DAG definition: DevRun=True, WorkDir="~/datatailr-tutorial". Here's what you should end up with:
from hello_world_batch.entrypoints import *
from dt.scheduler.api import DAG

with DAG(Name="Hello, Batch! (devrun)", DevRun=True, WorkDir="~/datatailr-tutorial"):
    new_message = create_message(job_config={"greeting": "Hello, batch"})
    output_message(message=new_message)
The DevRun boolean enables the Dev Run feature, while WorkDir tells it where to look for the code. The path must point to the folder with your Git repository, so change it if you're using a different directory.
Note: The "~" symbol refers to your home directory on the server. IDE is open there by default, so it will be the root folder in VS Code's explorer.
This convenience comes at a trade-off. A batch executed this way is not saved, i.e., it won't be available on the Batch Jobs tab in the Job Scheduler app. Once you're satisfied with the result, you'll have to rebuild both the package and the image.
Tip: You can use autobuild feature to trigger package and image rebuilds every time you push your changes to remote repository. Here you can read about setting it up: Autobuilder - Datatailr CI/CD.
Try running this script and check the results.
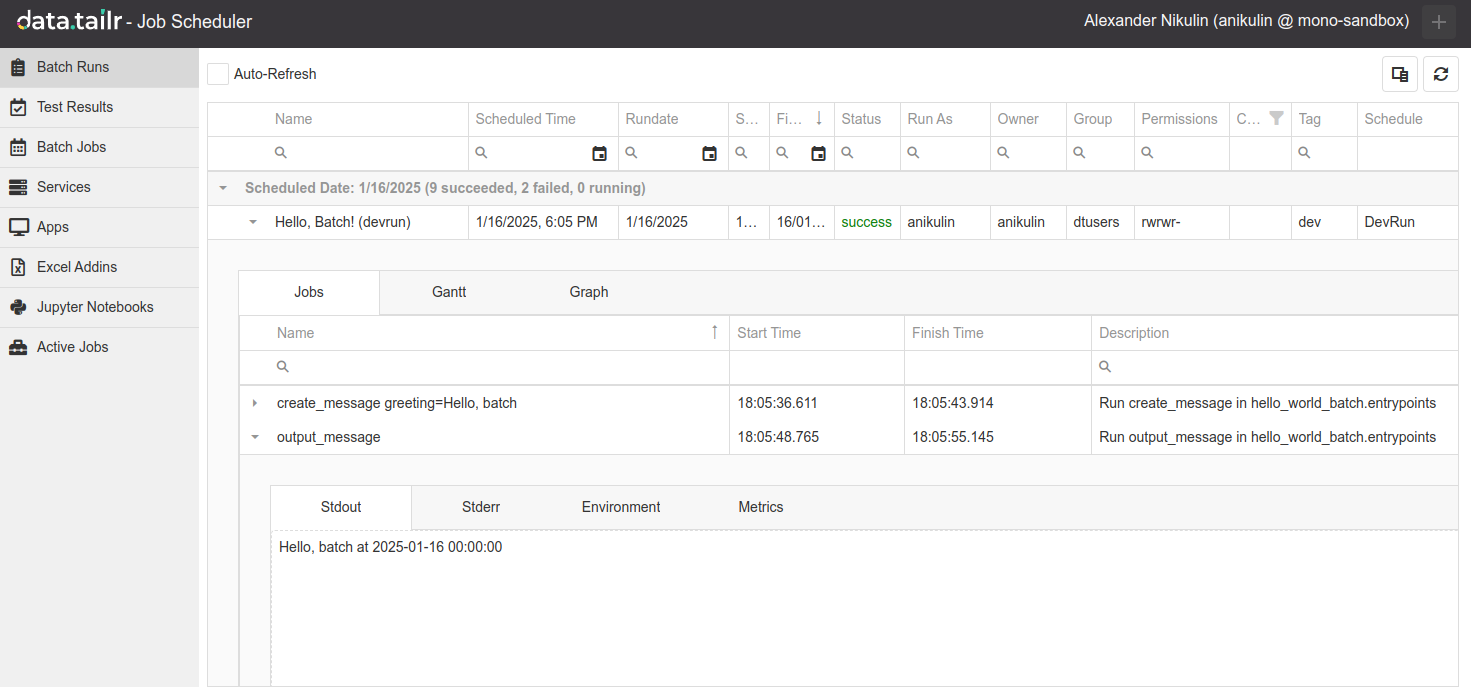
Explicit scheduling with Task objects
Datatailr's scheduler API also allows you to have more control over the Scheduled tasks. Instead of importing and "calling" the entrypoints, you can create Task objects explicitly. This way, you can use entrypoints from different images within one batch and set custom names and descriptions for each task. But you'll have to explicitly define dependencies and map job outputs to job arguments more verbosely.
from dt.scheduler.api import DAG, Task

image_name = "Hello Batch"
folder_name = "hello_world_batch" # folder from which you built the package
module_name = "entrypoints" # name of the file with entrypoints without .py

with DAG(Name="Hello, Batch scheduled with Tasks") as dag:
    create_message = Task(
        Name="Create Message",
        Description="Generating message based on greeting and rundate",
        Image=image_name,
        Entrypoint=f"{folder_name}.{module_name}.create_message",
        dag=dag,
        ConfigurationJson={"greeting": "Hello, batch"}
    )

    output_message = Task(
        Name="Print Message",
        Description="Printing recieved message",
        Image=image_name,
        Entrypoint=f"{folder_name}.{module_name}.output_message",
        dag=dag,
        ConfigurationJson={"arg_translation_table": {"Create Message":"message"}}
    )

    create_message >> output_message

    dag.save()
Here Image and Entrypoint values define the full path to the entrypoint. Image expects the name of the image, and Entrypoint needs the following format: folder_name.module_name.function_name. The module name is the name of your Python file without the.py at the end. For example, in the script above, on line 11, the value for the Entrypoint will be: hello_world_batch.entrypoints.create_message.
The create_message >> output_message syntax defines dependency. The task on the right will execute only after the task (or list of tasks) on the left is finished running.
ConfigurationJson defines the value passed to job_config argument during execution, but it is also used for mapping job outputs to the entrypoint arguments. On line 21, you can see how the output of the Create message task is mapped to the message argument. arg_translation_table is a dictionary with task names as keys and argument names as values. For task names you can use only the ones this task depends on.
Lastly, don't forget to call dag.save().
Try to run the script above. The job won't run yet but will appear in the Job Scheduler's Batch Jobs tab.
Job Scheduler UI
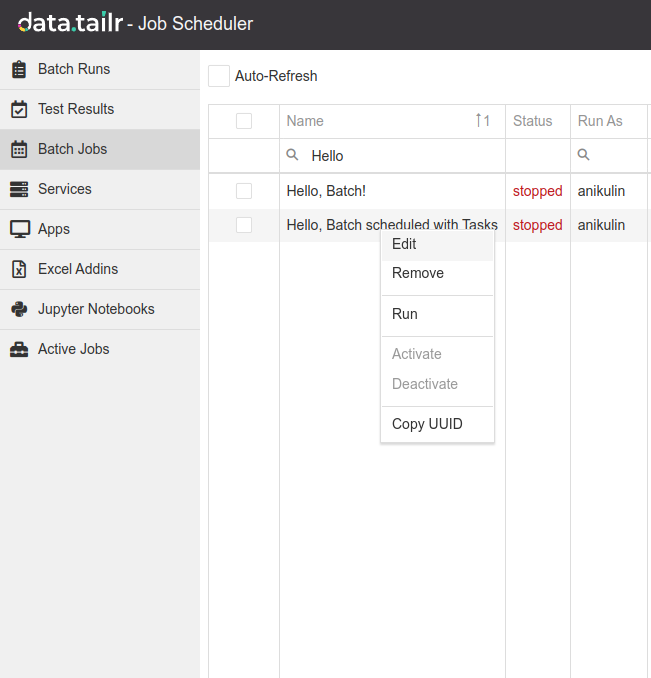
Let's examine the result of the scheduling script. Open the Job Scheduler app and navigate to the Batch Jobs tab. Find your Batch Job, right-click it, and choose edit:
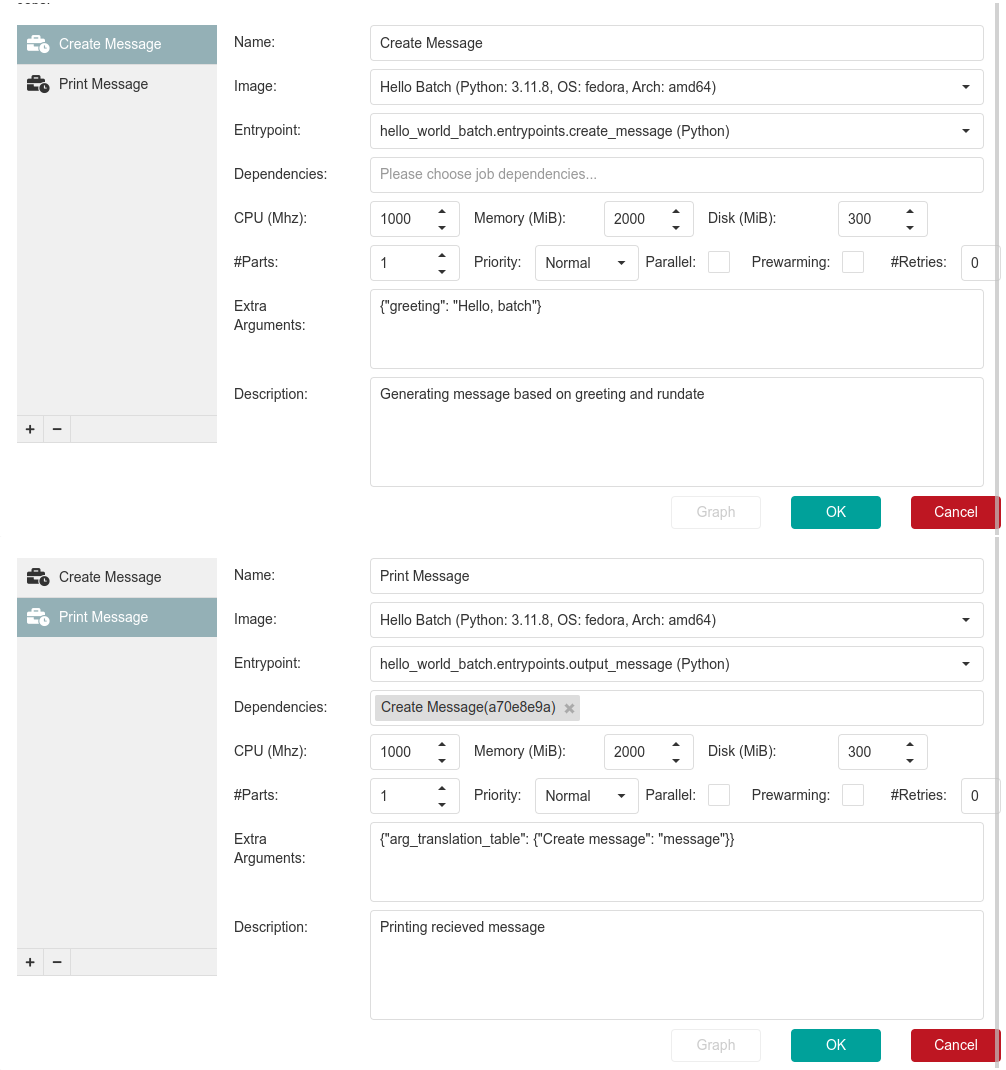
The top half of this window contains batch-wide parameters you defined in the DAG constructor. The bottom half includes the individual jobs and their parameters like Name, Description, Image, Entrypoint, and Extra Arguments (defines job_config and is equivalent to ConfigurationJson).
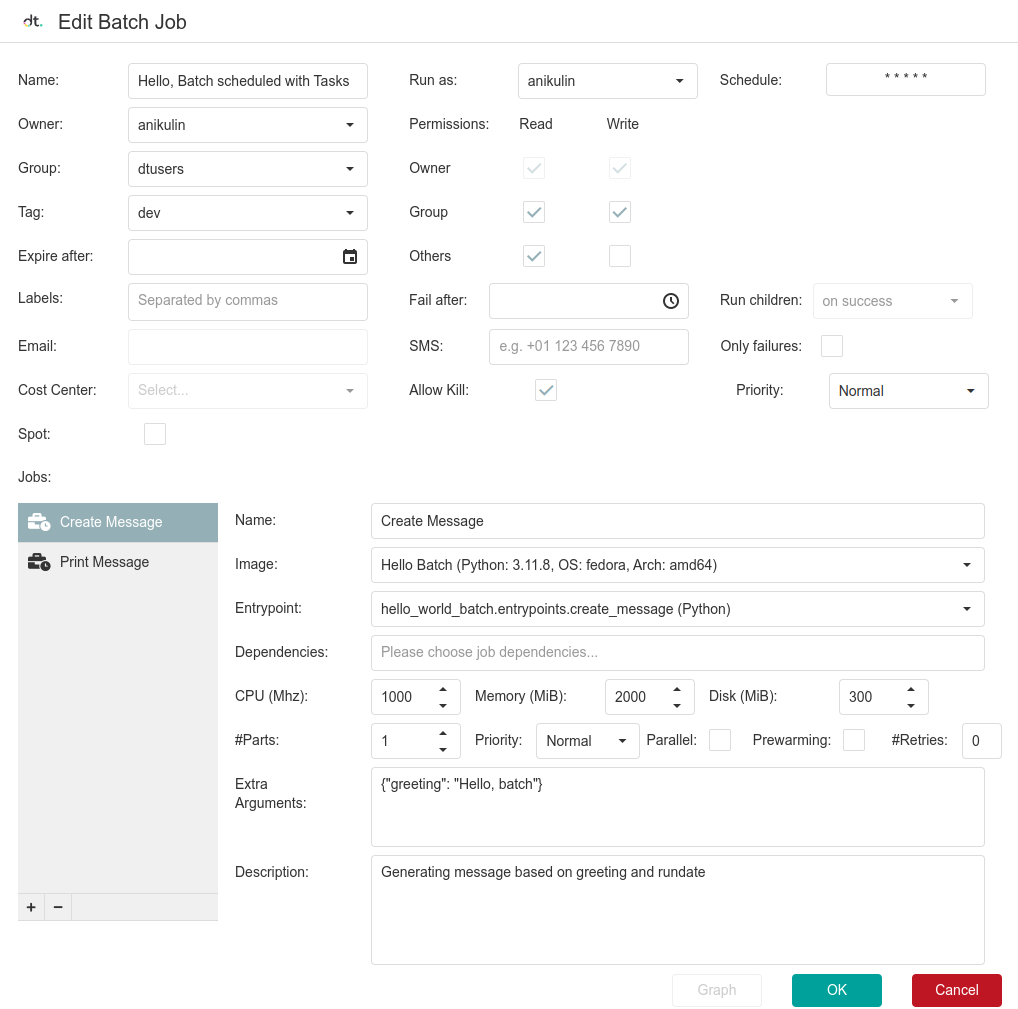
Here, you can edit all the parameters and add or delete jobs in the list. If you want to practice scheduling jobs via UI, try to schedule a similar batch job. Use the existing one as a reference.
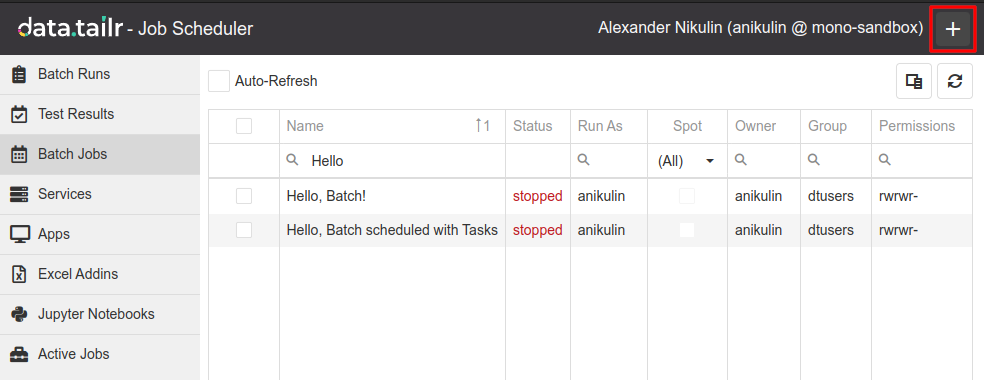
To create a new batch in Job Scheduler, press the Plus button in the top right:
Here are the job parameters for the Create message and Print message jobs in the UI for reference.
Congratulations! You know most of what you'll need to work with Batch Jobs.
Additional reading
Here are some helpful materials from the Scheduler API reference.
- dt.scheduler.batch — Argument names reserved by Datatailr batch framework.
- dt.scheduler.Schedule — How to schedule batches to run repeatedly at a specific time.
- dt.scheduler.DAG and dt.scheduler.Task — Parameters accepted by DAG and Task constructors.
- dt.scheduler.ParallelTask — How to optimize running multiple tasks in parallel.
- Batch Jobs with
__batch_main__— This guide to Batch Jobs uses__batch_main__()entrypoint, an alternative to@dt.scheduler.batch()decorator.
Updated 3 months ago
